
CHOCOLATE AND SALTED CARAMEL FATHERS DAY CAKE
June 19, 2016

It's Fathers Day today and there's still lots of time for you to make this amazing cake!
There is no short way of telling you what this cake is, so here it goes…
This is a chocolate cake filled with salted caramel sauce and a salted caramel buttercream, topped with salted caramel sauce, chocolate ganache and shards of toffee and chocolate decorated with white chocolate and gold stars!
(please read above in the Master Chef lady voice)
Our dad loves anything chocolate so we wanted to make this something more than your average chocolate cake. We have been loving salted caramel things recently and let me tell you, this is the best butter cream you will ever taste!


In all honesty the final outcome of how it looks is not what we had planned. Apparently chocolate ganache does not stay on top of salted caramel! When we attempted to pour on a smooth layer of ganache on the very top, it all kind of slid off and created a marbled effect on top, which we actually much prefer so this was a happy accident. Next time we make this, we will put the ganache on first (and let it set) and then the salted caramel sauce on top of that.

This is the recipe which we used for the sponge:
Let's get started...

Ingredients
for the cake...
260g plain chocolate
300g butter
300g self raising flour
45g cocoa powder
1.5 tsp baking powder
300g butter
300g self raising flour
45g cocoa powder
1.5 tsp baking powder
6 eggs
450g light brown muscovado sugar
450g light brown muscovado sugar
for the buttercream...
115g butter
285g icing sugar
approx. 1/3 of the salted caramel sauce
for the salted caramel sauce...
90g brown sugar
85g caster sugar
50g butter
300ml double cream
1 tsp salt
for the ganache...
100g dark chocolate
100ml double cream
for the decoration...
215g sugar
60ml water
1 bar of dark chocolate
gold/white chocolate stars (optional)
Pre-heat your oven to 180°C/160°C Fan/Gas mark 4.

We used two 7 inch, loose-bottomed cake tins, so we baked 2 of the layers first then the last one separately. If you have 3 tins you could make them all at once. We made two thirds of the batter first then made the other later on. Before you start, take your tins and grease and line them.
First, place 200g of the butter, 175g of chocolate and 100ml of water into a small pan and heat gently until melted and smooth.
First, place 200g of the butter, 175g of chocolate and 100ml of water into a small pan and heat gently until melted and smooth.

In a separate bowl sift 200g of the flour, 30g of cocoa powder and 1tsp baking powder and combine, then stir in 300g of the muscovado sugar. Beat 4 of the eggs into the flour and then pour in the melted chocolate mixture and beat until smooth.

Separate the mixture into the two cake tins and place in the oven for around 40 minutes or until an inserted skewer comes out clean.
Once your first two cakes are out of the oven you can start making the final one using the same method but with the following quantities; 87g chocolate, 100g butter, 50ml water, 100g flour, 15g cocoa powder, 1/2 tsp baking powder, 2 eggs and 150g muscovado sugar.
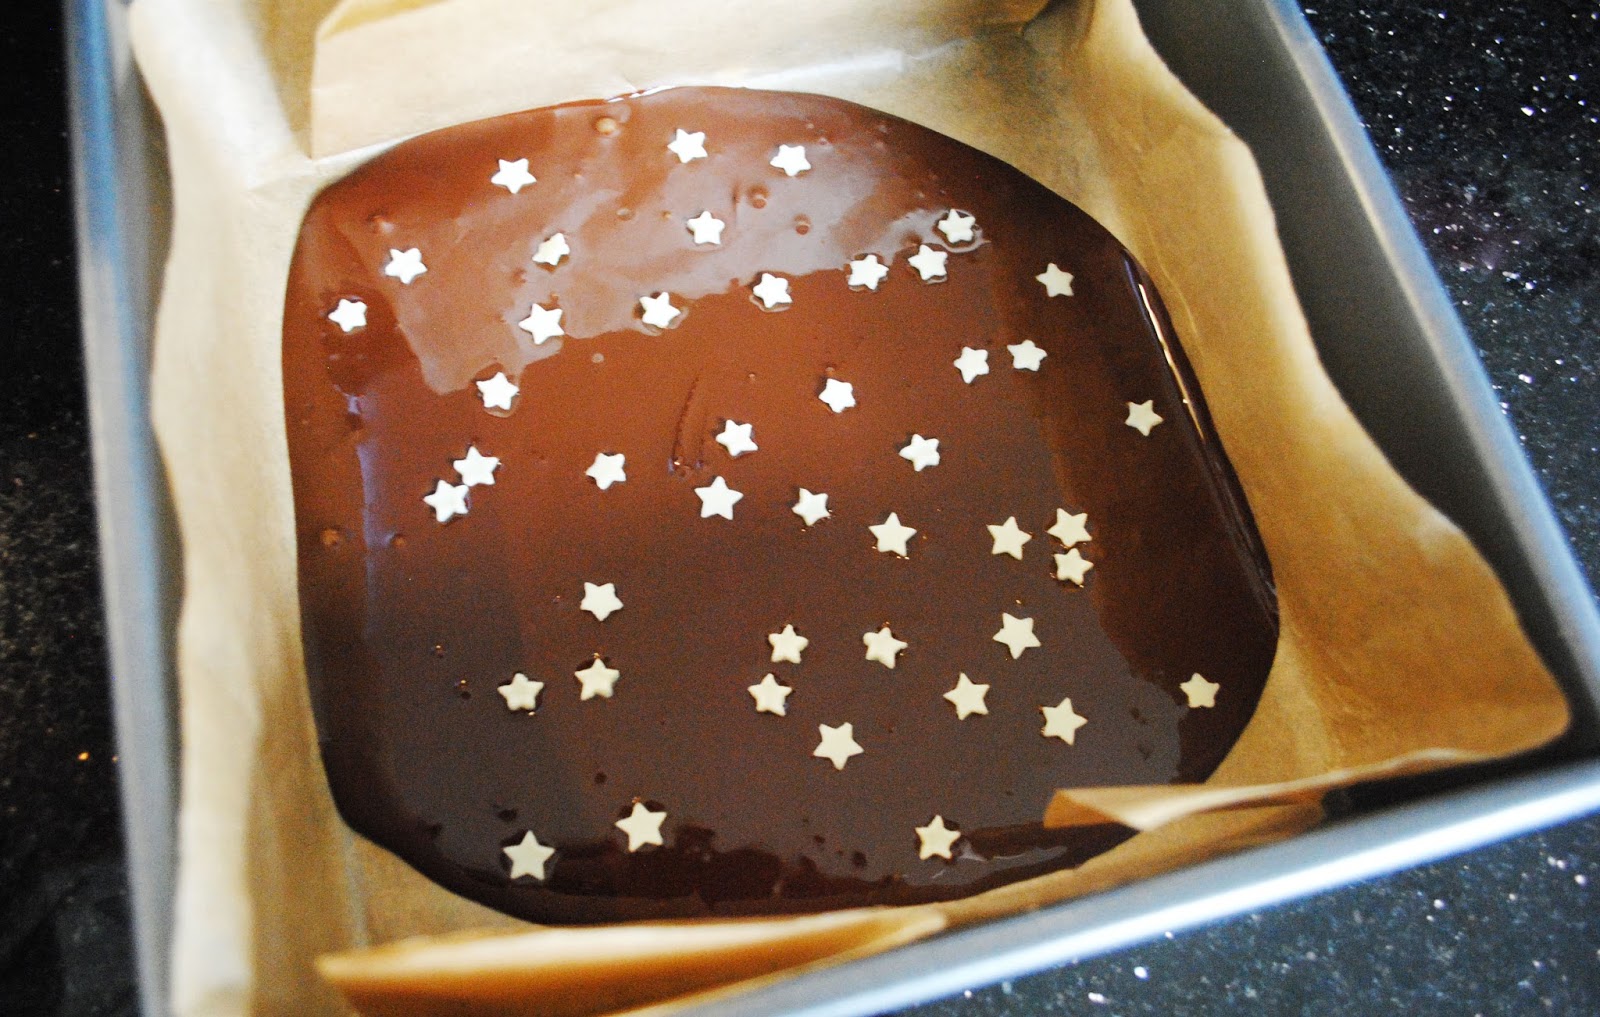
While your cake is in the oven you can get on with making the shards which will decorate the top of the cake. For the chocolate ones, break up one whole bar of dark chocolate into a bowl and melt in the microwave. Grab a square/rectangle baking tray or tin and line with greaseproof paper. Pour the melted chocolate into the tin and sprinkle with stars. Then place in the fridge/freezer until you are ready to decorate.

Now onto the toffee shards! Place the sugar and water into a small pan on a low heat and stir until the sugar has dissolved. Then turn up the heat and leave to bubble until it goes a light golden colour. Then take the toffee off the heat and pour straight into another lined tin. Decorate with more stars (if you want) and just leave out to harden! It hardens pretty quickly so if you are decorating with anything you need to do it straight away!


Measure out the sugar into a medium sized pan, and place on a medium heat until the sugar melts into a thick liquid. The sugar will clump a little before it melts so don't worry if it looks a little odd, just try not to let it burn! Once the sugar is completely melted, add the butter and stir until melted into the sauce, the butter will bubble a lot so be careful that it doesn't spit at you! Slowly add in the double cream, stirring after each addition. Allow the sauce to boil for about a minute then remove from the heat and add in a teaspoon of salt. Now, transfer the sauce into a cool pan and place in the fridge to cool down. Once the sauce has cooled you can taste it and add in more salt if you find it needs it.

Once your sauce has cooled you can make the buttercream, then you're finally be ready to start assembling! Beat the butter and icing sugar together until smooth then pour in about a third of the salted caramel sauce. Taste the buttercream and if you find that you want it more flavoured you can add more of the salted caramel. If your buttercream is too runny at this point you can just add more icing sugar until you are happy.

Now time to put the cake together! Start with the first layer of cake and spread on a nice generous layer of buttercream. Then pour on some of the caramel sauce and spread out to cover the buttercream. Repeat this with the second layer. Place on the final layer of cake and spread on the last of the buttercream. Like we said at the top, the ganache doesn't stick on top of the caramel so we would suggest that you do this the other way around (or like us just go for the marbled look and see what happens). Pour a pool of the sauce/ganache in the centre of the cake and using a spoon push it out towards the edges, letting some of it drip down the sides. Repeat this step with the other sauce.

Time to decorate the top! Take the caramel out of the tin and remove the greaseproof paper. If the paper is a little stuck, use a hair dryer on the back and it will peel straight off. Get a knife and break the caramel into rough shards which vary in size. Pop these straight onto the cake as they will start to get very sticky! Push them down into the cake to help them stand up. Repeat this with the chocolate, again working fast as it will start to melt!


Thank you for reading this post!
We really hope that you have a go at this cake because it is definitely one of the tastiest cakes we have ever made!
Let us know by leaving a comment or tagging us on Instagram/Facebook if you try any of our bakes.
Please follow us on Bloglovin’ and Instagram, and also go over and like our new Facebook page Sharkett Sisters!
We are off on holiday today for 9 days so we will see you when we get back!
Love, Antonia and Imogen x


